GitHub Actions is a powerful automation tool first introduced by GitHub back in 2018 and has significantly matured over the last few years. It can be leveraged to automate workflows based on events and is commonly used to validate code changes in response to “Push” and “Pull Requests” events but it can also be used as a complete automated build system replacement for tools like Jenkins and TeamCity. GitHub Actions are configured via event-driven, user-defined automation scripts defined in YAML and stored in your repository inside the special .github/workflows directory. This allows you to “edit, reuse, share, and fork them like code”. You can use any of the 10,000+ actions available in the GitHub Marketplace or even create your own custom actions. GitHub provides a fixed number of free usage minutes if you utilize their provided servers for running your events (see their billing page for more info.) However, you can use this feature without any per-minute charges if you utilize your own locally hosted runners.
In our last blog post in this series, we covered how to install a self-hosted runner which can be used by Delphi developers to take advantage of this powerful cloud-managed workflow automation to run scripts on their local Windows machines. That blog post detailed the steps to get the runner installed, and this post will provide a simple “Hello World” workflow automation example to get you started. The example will be included in the delphi-automation-sandbox public repository on GitHub which was originally created for a previous blog article on Getting started with Delphi and Jenkins.
Workflow Basics
You can create a new workflow using the browser interface, or by manually creating a YAML formatted text file in the special .github/workflows directory in your repository (visit the workflow syntax for GitHub Actions page for configuration syntax.) There are two main items for you to define: at least one event trigger and at least one job.
There are currently about three dozen different types of events that you can use to trigger workflow jobs. One of the most basic events is a workflow_dispatch event which is triggered when you click on a “Run Workflow” button in the Actions tab of your repository.
Jobs define the work to be done and are made up of one or more steps which run commands, actions or configuration tasks. Jobs run in parallel by default and each step runs in its own process within a runner environment. You define where the jobs are run by using runs-on property and providing one or more operating system labels used by GitHub-hosted runners and/or a self-hosted label.
Workflows are highly scalable but do have some limits defined which vary based on your current plan. The free plan offers 20 concurrent jobs while the Enterprise plan allows 180. You can queue 500 workflow runs within a 10-second interval per repository and each job is limited to 6 hours of execution time.
Hello World On A Self-hosted Runner
Let’s start by creating a simple workflow that does nothing but echo “Hello World!” at a command prompt on your Delphi machine in response to a manually triggered workflow event on GitHub.
View the Actions page of your repository and you should be presented with a screen similar to the screen shot below with the option to set up a workflow yourself. Click that option to create your first workflow. There are many suggested pre-built workflows that you can review later. (Once you have at least one workflow defined, there is a New workflow button option to add a new item manually.)

The next screen will allow you to define the workflow filename and edit its contents. The workflow will automatically be populated with an example push/pull_request events. Let’s replace that with the simple configuration shown below.
1
2
3
4
5
6
7
8
name: Hello World
on: workflow_dispatch
jobs:
  example-job:
    runs-on: self-hosted
    steps:
      - name: example-step
        run: echo "Hello World!"
Note the YAML syntax used (spacing is important.) For more info, see this Grijjy blog post on YAML for Delphi developers.
Key items of this example workflow include:
| Item | Description |
|---|---|
| name: | This is an optional property that is used for display purposes. If you do not provide a name the file path will be used instead (.github/workflows/{filename}) |
| on: | This will contain one ore more events used to trigger this workflow. In this example, we are specifying only one trigger: workflow_dispatch. |
| jobs: | One or more jobs need to be defined under this workflow property. |
| example-job: | Each job listed needs to be assigned a unique identifier that must start with a letter or “_” and contain only alphanumeric characters, “-“ or “_” |
| runs-on: | This determines the type of machine(s) to run the job on. In this example, we are using self-hosted to run on our local Delphi machine that we previously installed a GitHub Runner. |
| steps: | Each job needs one ore more steps defined to perform the workflow tasks. |
| - name: | This is simply the name of the step as displayed in GitHub. |
| run: | This is an example command which we simply echo Hello World at a command prompt to verify the workflow is working properly on your runner. |
Change the filename to helloworld.yml and enter the hello world script provided and click on the Start commit button to save your changes as shown below. You can then enter in a commit message and click on the Commit new file button to save.

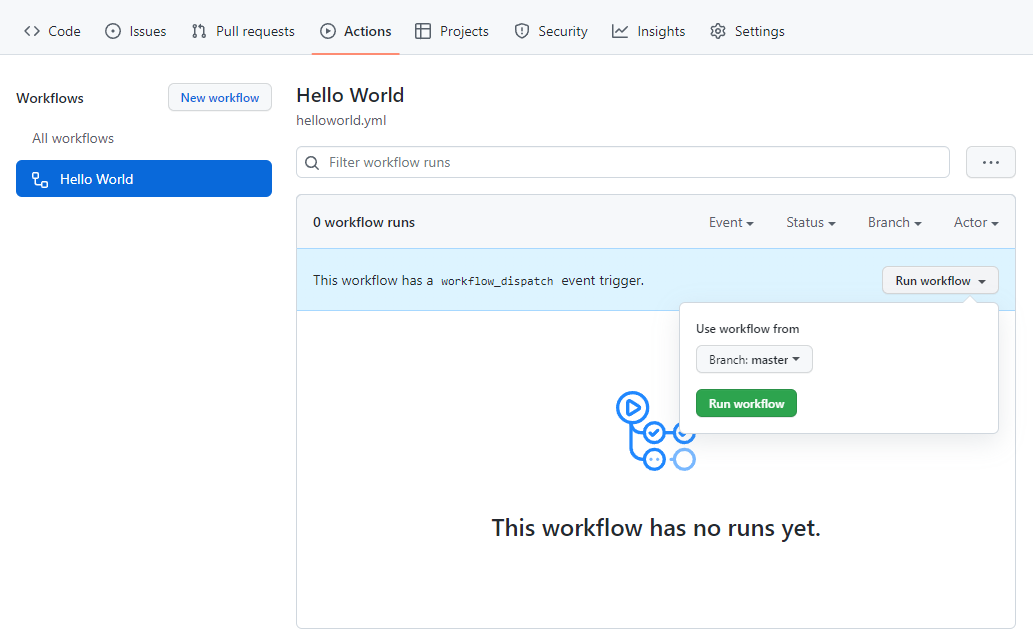
You should now have a helloworld.yml file saved in the .github/workflows directory in your repository! Now all you need to do is to run the workflow by visiting the Actions page of your repository. This page will list all your repository Workflows as seen below:

Click on the Hello World workflow and the detail panel will be populated offering you a chance to click on the Run workflow button as seen below. Click this button to manually run your workflow on your local system using the self-hosted runner installed. (Once you click the button, you will be prompted with the option to select the desired branch before needing to click the green Run workflow button to actually start the workflow.)
NOTE: The very first time you execute scripts on your local machine, you may run into a permissions error. By default, the PowerShell ExecutionPolicy on your Windows machine is set to Restricted and all PowerShell scripts will fail to run. If this is still set at the default value, you will need to change this configuration setting via a PowerShell command with Administrator access. After adjusting this setting your GitHub Action scripts should run as expected:
1
Set-ExecutionPolicy -ExecutionPolicy RemoteSigned.
Once your workflow has been triggered, the GitHub Actions scheduler takes over and coordinates the running of your workflow. It may take a few seconds for you to see any progress on your workflow being executed. In under ten seconds or so, your workflow should complete and you should have a green check icon next to it listed in the detail pane. You can click the workflow name in the detail pane to drill down to view the workflow execution results.
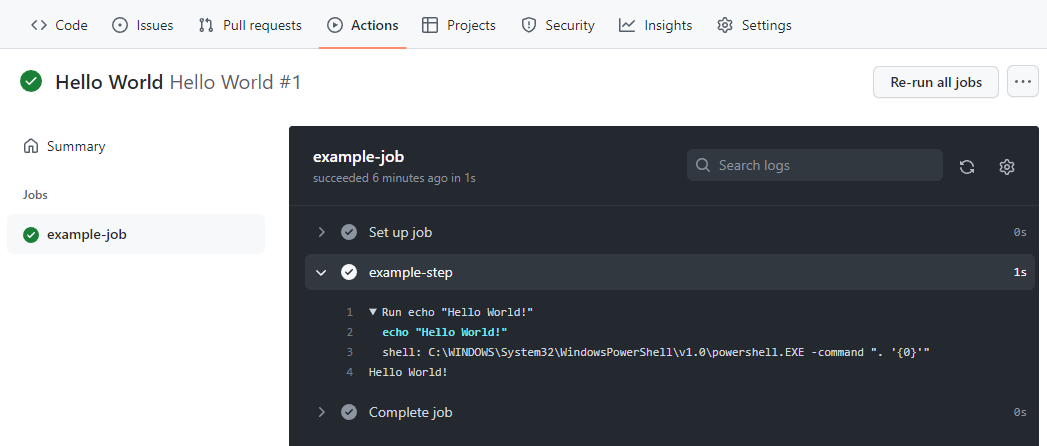
The workflow execution detail page for the Hello World initial execution is shown below. Only one job was specified for this workflow so this is a rather simple display that shows the jobs, the event trigger, status, and duration.

To see more details, click either of the two example-job links to drill down into the job logs as shown below to view all the steps taken to prepare/clean-up your job and also the execution log for each of your jobs. In our simple example, we see that the single command executed without error and the console output was captured to the log.
Once you can successfully run this very basic workflow, you should be able to easily expand on these concepts to run multiple jobs with multiple steps to automate specific tasks.
For example, one powerful event type that you can specify is schedule which allows you to trigger your jobs based on defined CRON type schedule. You could use this to build your projects on a nightly basis, automatically run your unit tests, and deliver a report of the test run results. Once you start down the automation path, the opportunities are nearly endless!
In the next blog post in this series, we will automate the building a Delphi project using a custom GitHub Actions workflow. Let me know if you have any questions or special requests for GitHub Actions, automation related issues, or Delphi in general.